


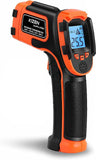
The first step before you insulate your home is to use a heat loss thermometer to gauge the heat loss areas. You can pick one up from Amazon for under $25. A home heat loss thermometer is a simple tool that can help you identify areas in your home where heat may be escaping, leading to increased heating costs and decreased comfort. Here's how you can use one:
-
Buy a Heat Loss Thermometer: These are usually available at hardware stores or online. They're often handheld devices that look like a small gun with a digital display.
-
Turn on the Thermometer: Most heat loss thermometers are battery-operated. Simply press the "on" button to start it up.
-
Point at the Area to be Tested: Hold the thermometer a few feet away from the area you want to test. This could be a window, a door, an exterior wall, or even an electrical outlet.
-
Read the Temperature: The device will display the temperature of the area you're pointing at. Lower temperatures could indicate heat loss.
-
Compare Temperatures: To determine if there's significant heat loss, compare the temperature reading to other areas of your home. For example, if a window shows a much lower temperature than the surrounding wall, it might be a source of heat loss.
-
Identify Problem Areas: Use the thermometer to scan all potential sources of heat loss in your home. This includes windows, doors, walls, and even floors.
Remember, a heat loss thermometer can help you identify problem areas, but it won't tell you how to fix them. Once you've identified sources of heat loss, you may need to insulate those areas, seal gaps, or take other steps to improve your home's energy efficiency.
Please note that this is a general guide and the exact usage may vary depending on the specific model of your heat loss thermometer. Always refer to the user manual for accurate instructions.
How to Insulate and Seal Your Attic from Harsh Winter Cold
Winter can be a challenging season, especially if your home isn't adequately insulated. One of the most significant sources of heat loss in a house is through the attic. Luckily, insulating and sealing your attic can help retain warmth, reduce energy consumption, and save on utility bills. Here's a comprehensive guide on how to insulate and seal your attic against harsh winter cold.
Assess Your Current Insulation
Before you start, it's crucial to assess the current state of your attic insulation. Inadequate or old insulation might be the reason for heat loss. Look for areas where the insulation has become thin, compressed, or damaged. Also, check for moisture, as it can degrade the insulation material over time.
To determine whether your attic has enough insulation, you can perform a visual inspection or hire a licensed insulation contractor to assess it for you. Here are some steps and signs to look out for:
Measure the height of your insulation from the floor of your attic to where the insulation stops. Older homes typically were insulated with four- to five inches of insulation. If you have “bat” insulation (that’s the pink sheets of fiberglass insulation backed by brown paper) sometimes it does not seal sufficiently thus putting a layer of blown insulation may insure you fill those voids and corners. You can estimate the R-value of the insulation based on its depth. For fiberglass and cellulose insulation, you can estimate about R-3 per inch of depth. If the insulation is not evenly distributed, there are low spots, or there is moisture in the insulation, these could be signs that you do not have enough insulation. Look out for water leaks, ice damming, pest problems, cold drafts, and other signs of damage. If your insulation crumbles when touched, this could indicate that it is no longer sufficient due to its age, but if your home was built in the last 20-30 years crumbling insulation is pretty rare, however really old homes need special inspections. Check that the roof vents (soffits) are not obstructed by the insulation you placed in the attic and that the ridge vent (on the top of an "A" framed roof) is clear. Remember, it's always best to consult with a professional if you're unsure. They can provide a more thorough inspection and give expert advice.
Select the Right Insulation Material
Insulation materials come in various types, each with its unique properties. The main types include fiberglass, cellulose, and spray foam. Fiberglass is the most common and affordable choice. It comes in rolls or batts and is easy to install. Cellulose is eco-friendly and offers excellent thermal performance. Based on my search, the best manufacturers of fiberglass insulation are Johns Manville, Guardian, Knauf, and Owens Corning,
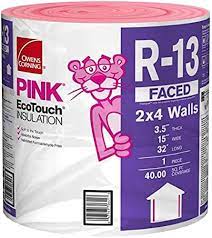
but I’m sure there are others. One of the top picks for the best attic insulation for fiberglass roll is the Owens Corning EcoTouch. This product has advanced fiber technology that allows for quick installation and is available at home centers everywhere. If you're considering blown-in insulation, US Greenfiber R60 Blown-In Insulation Sound Barrier is highly recommended. For batts or rolls, Owens Corning R-38 Kraft Faced Fiberglass Insulation is considered a top choice.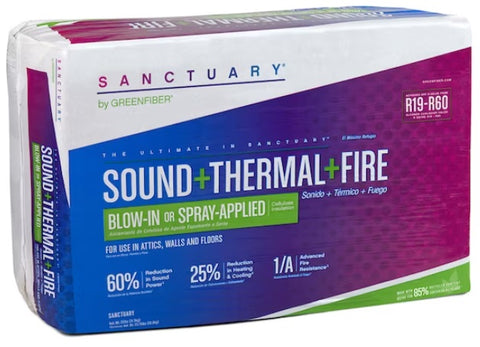
Spray foam expands to fill gaps, providing an air seal as well as insulation. Installing spray foam insulation can be a straightforward process if you follow the right steps and tips. Spray foam insulation is a material that's sprayed as a liquid and then expands into a foam, filling in gaps and creating a moisture and air barrier This can be an extremely messy job for DIYers and I highly recommend hiring a professional to do this unless you are pretty skilled or very good at following instructions or watching professionals do it on YouTube. When working with spray foam insulation, ensure you're wearing appropriate protective gear to prevent any possible harm Spray foam insulation should not be applied to a wet surface. It's essential to make sure the area is dry before starting If there's pre-existing insulation in your home, it may need to be removed before the spray foam insulation is installed. This isn't necessary for new buildings When applying the foam, fill the void slowly, moving along the gap as you foam. The spray should be continuous, with no voids or breaks Before starting, ensure the job site is prepared correctly. This could involve cleaning and clearing the installation area Remember that while spray foam insulation can be a DIY project, it's always recommended to consult with a professional if you're unsure about any part of the process.
It's important to note that the "best" insulation depends on various factors such as your home's location, the climate, and specific needs of your home.
Determine the R-Value
The R-value measures the insulation's resistance to heat flow. The higher the R-value, the better the insulation. The recommended R-value for attics in colder climates is R-38 to R-60. The "R" in R-value stands for "resistance", specifically thermal resistance. This is a measure of how effectively a material insulates against heat transfer. The higher the R-value, the better the material is at insulating and keeping heat in or out of a structure.
When it comes to home insulation, different parts of your home require different R-values. Here's a general guideline:
Attic: R-30 to R-60
Walls: R-13 to R-23
Floors: R-25 to R-30
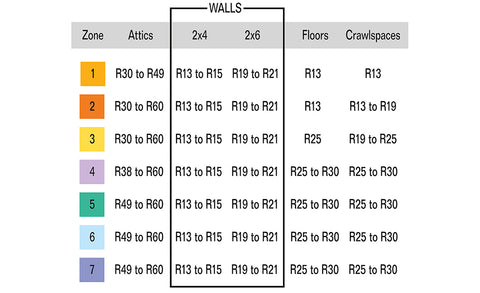
Basement walls: R-10 to R-15
However, these values can vary depending on where you live. For example, homes in colder climates will benefit from higher R-values to keep heat in, while homes in warmer climates may not need as high an R-value. It's also important to note that while a higher R-value generally means better insulation, it's not the only factor to consider. Proper installation is crucial to get the full benefit of the insulation. Even the highest R-value insulation won't work effectively if it's not installed correctly. Lastly, while insulation with a higher R-value is more effective at reducing energy loss, it's also typically more expensive. Therefore, it's important to balance the upfront cost of the insulation with the long-term energy savings it will provide. Keep in mind that local building codes often have minimum R-value requirements, so be sure to check these before adding or replacing insulation in your home.
Seal All Air Leaks
Air leaks can significantly undermine the performance of insulation. Use caulk or spray foam to seal around plumbing vents, electrical wires, and light fixtures. Also, ensure that the attic lift opening, attic door or hatch is well-sealed. If you have an attic lift such as a Versalift, you can install insulation tape on the ceiling cover to help seal it off. This garage lift has 4 springs in the legs of the carrier that stretch holding the ceiling panel tight against the ceiling to assist in sealing off the attic from the garage, and you can drape a moving blanket or grill cover over the lift when not in use for added protection.
Protecting Against Moisture While Maintaining Proper Ventilation
Protecting your attic against moisture in wintertime and maintaining proper ventilation involves a few crucial steps.
One of the key ways to control condensation is by ensuring proper roof ventilation. I know in Oklahoma this is an issue. This helps to speed up drying when condensation does occur. For instance, continuous ridge and soffit vents with insulation baffles can be used to keep the ventilation unblocked. Ventilation also improves the exfiltration of air, which in turn reduces attic temperatures. Lower temperatures can help to reduce condensation. Sealing, insulating, and ventilating are three key steps you can take to solve issues with heat and moisture in the attic. Proper insulation and air sealing can help to keep attics cold in winter by blocking the entry of heat and moist air from below. Maintaining a constant airflow can help to prevent dampness caused by warm air getting trapped in your attic. Keeping the rest of your home dry can help to control the overall humidity in your attic. This can be one of the easiest ways to keep your attic free of excess moisture. Having adequate ventilation in your attic can help to curb problems associated with excess heat and moisture buildup. This is particularly important during the winter months. Remember that every home is different, so what works for one might not work for another. It's always a good idea to consult with a professional to ensure the best methods are being used for your specific situation. Moisture can damage insulation and reduce its effectiveness. Install a vapor barrier, such as a sheet of plastic, over the insulation to prevent moisture penetration. Even with insulation, your attic needs proper ventilation to prevent moisture buildup and ice damming. Make sure your soffit vents are not blocked by the insulation, and consider installing a ridge vent for better air circulation.
Regular Maintenance and Inspection
Regular checks and maintenance will ensure your insulation stays effective for a long time. Look out for signs of dampness, mold, or pests, and address any issues promptly.

Insulating and sealing your attic is one of the most cost-efficient ways to improve your home's comfort and energy efficiency. While it's a task you can DIY, hiring a professional can ensure it's done correctly and safely – especially if you have an older home that may contain asbestos or other hazards. Stay warm and save money this winter by giving your attic the insulation it needs.
Remember, every home is unique. What works best for one might not work for another. So, take your time to understand what your house needs and choose accordingly.
Stay warm, save energy, and enjoy the cozy comfort of your well-insulated home this winter!

Leave a comment